
Hello guys. Welcome to my second article fully dedicated to the creation and optimization of the Google ads search campaign. First of all, I want to thank you once again for your interest in my website. I honestly really appreciate it.
As we’ve discussed in the previous article which I’ve planned it to be some sort of an introduction to the world of online advertising for beginners or even those people, who have some experience with online ads, the most popular and fundamental type of online advertising campaign is considered to be a search campaign.
That’s why, it’s very logical from my side to explain to you a step-by-step process of the creation and initial optimization of Google Ads search campaign in particular, as your first campaign ever.
I suppose that some of you may already have an active Ads account, but I want this tutorial to be extremely detailed so everyone can understand everything and easily follow me. For this reason, I’ll start with the creation of the account. Ok. Let’s not waste any time and start right ahead.
Creation of the Google Ads account
So the first thing you need to do is to open up Google’s homepage and click “Advertising” in the lower-left corner.
After that, you will land on the page that has 2 clearly seen buttons. One of them is in the middle (green) and it says “sign up”, and the other one is in the form of the text and it says “log in”.
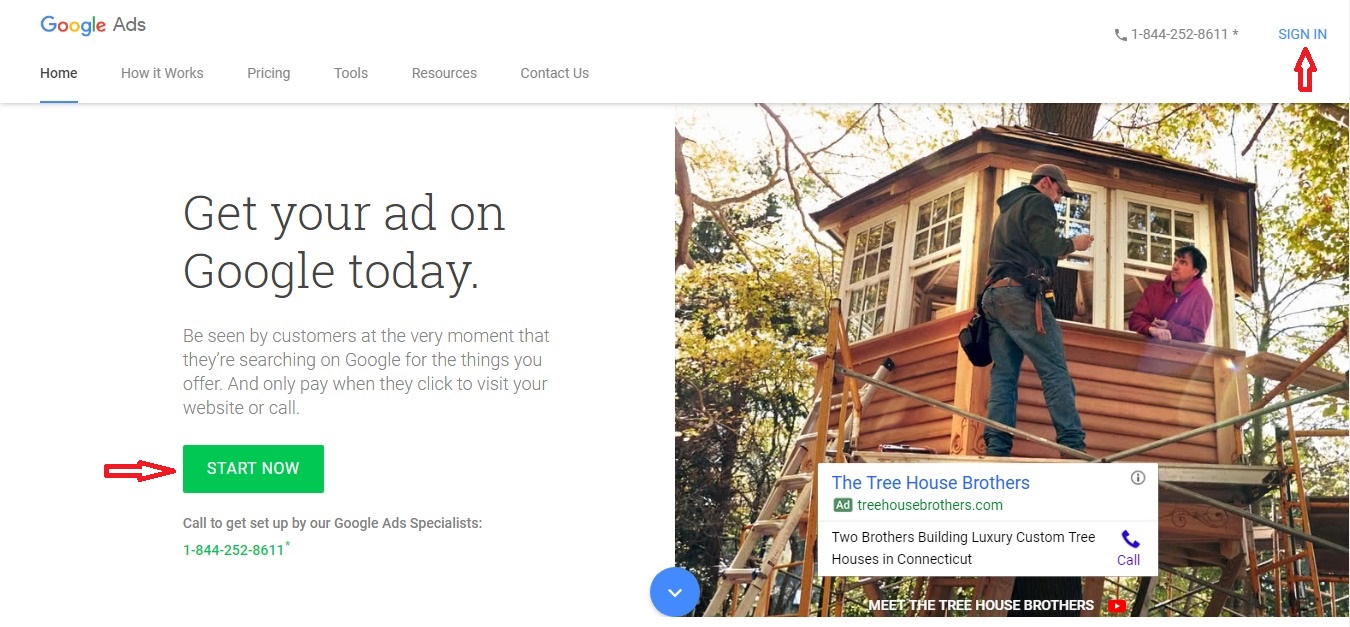
Honestly, there’s absolutely no difference as to which one to choose because both of these links will take you to the page that will ask you to type in your email address. And here’s one important thing. You need a Google Account to proceed.
If you have already used some other Google services (for example, Gmail or YouTube) then you do already have it and you just need to type in the email associated with it (by the way, it shouldn’t be necessarily Gmail) and then enter your password. (it’s the same for all Google services).
If you don’t have a Google account, in case you’ve chosen the first way, the creation of the account will start automatically, and if you’ve clicked “sign in” then click on the blue link that says “create an account”.
The creation of the Google account is very simple and straightforward and I’m sure that you will not have any problems with it.
After this, in most cases, you will see a white page that says “Welcome to Google Ads” and 2 additional lines that say “what is your email address” and “what is your website?”

Attention! I highly recommend you not to enter your website in the second field but click on the blue link above that says “Skip the guided set-up”. The thing is that in the first case, the process of the creation of a so-called AdWords Express campaign will start.
In a nutshell, it’s an extremely simplified type of campaign designed for beginners in which you don’t have access to most of the settings.
For example, you won’t be able to add your own keywords and set bids for them in the future. (Which is very important). So if you click on the blue link that I’ve told you about, you will see a simple page on which a system will ask you to set your billing country, time zone, and currency.
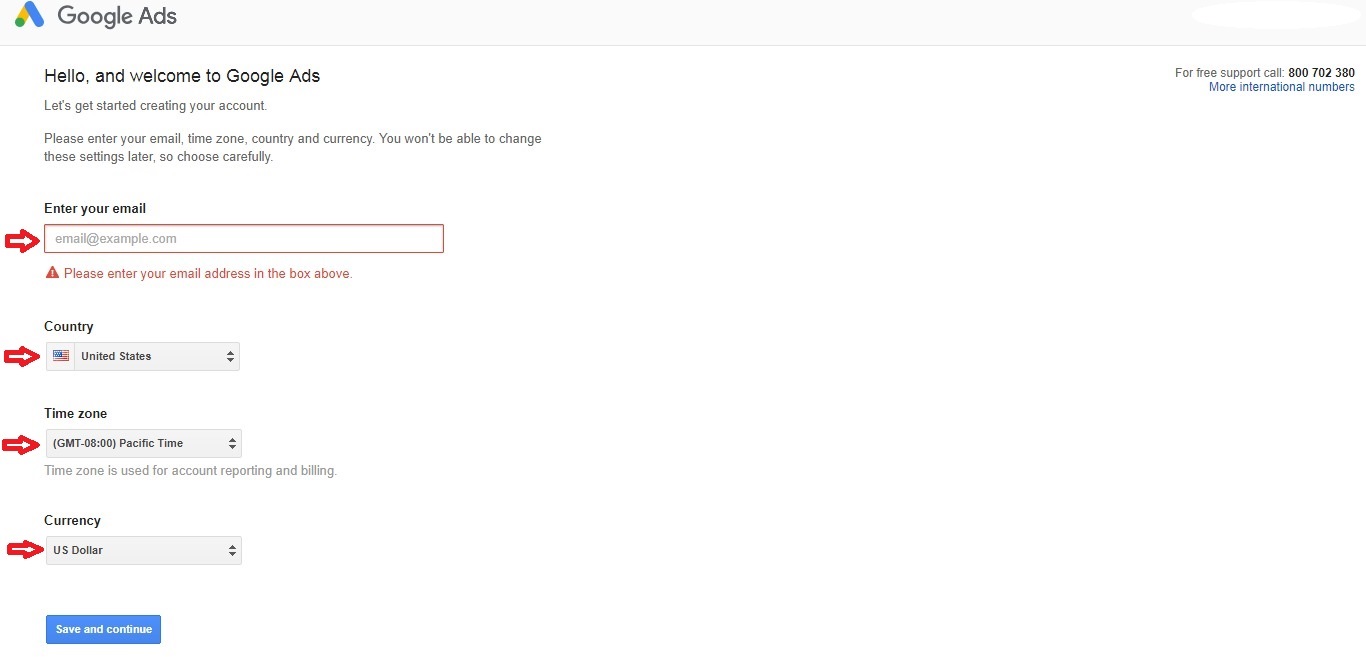
And again, I ask you to be very attentive here because you won’t be able to change these fundamental settings in the future. After this, the system will let you into the main page of the Google Ads user interface. Yes, you don’t even need to enter your personal or credit card details to get there.
At this point, I want to ask you to be very attentive again. In some situations (depending on your email address) at the very beginning, the system will not take you to the white page that I’ve described earlier (with Skip the guided set-up link) but to another page that will ask you “What is your main goal?” (Get more calls, get more visitors to your physical location, etc).

In such a case, I also encourage you not to choose anything from this list but find a blue “experienced with Google ads?” link.
After this, the system will propose you create your first campaign right after but it’s better to click “create account without a campaign”, enter the same simple but very important info such as a billing country, time zone, currency and then click “send” to continue.

After this, just like in the first situation discussed earlier, the user interface will start loading.
Billing set up. Automatic & manual payments
Theoretically, you can start the creation of the campaign now but I encourage you to click on the wrench icon in the top right corner of your screen (tools) and click “billing and payments”.
On that page, the system will ask you to complete the creation of your payments account. You will need to enter such basic info as the name and address of your company, your name, phone number but what’s more important, the way “how you pay”.
The important thing is that depending on the country that you have selected, you will either have a chance to choose between automatic and manual payments.
In addition to that, in some countries, you will have an opportunity to also choose between a personal and a business account. The main difference is that in the first case you don’t need to provide the details of your company and what’s more important, you won’t be able to receive accounting documents that the users of a business account do.
So let’s talk a bit about the difference between manual and automatic payments. If you choose manual payments (again, if your country supports it), the process of making a payment will be extremely clear and simple.
You just make a payment, and if you’ve spent all the money then your ads will stop serving. To resume, you need to go to the “billing and payments” again, click on the blue “make a payment button”. After this, your ads will continue serving.
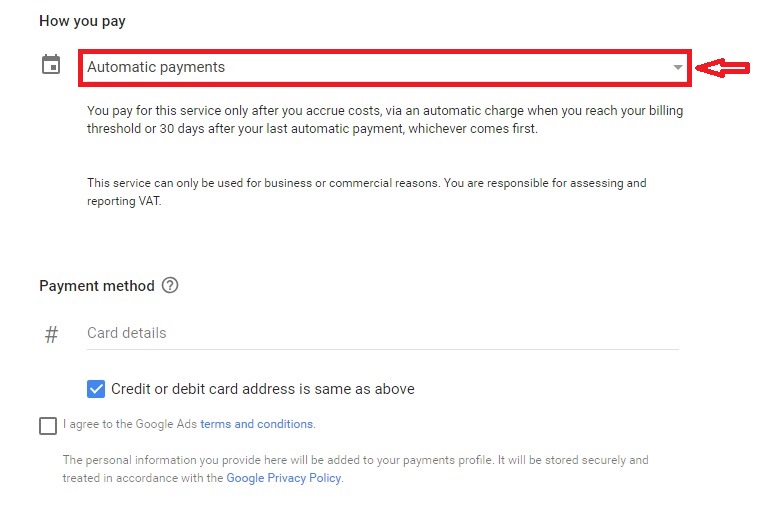
But in case you choose automatic payments, the process can be pretty unclear to some people at the beginning because although the system will ask you to provide the details of your credit or debit card, it will not be charged right after and the ads will start serving. (After the creation of the campaign, of course).
The thing is that you pay after reaching the threshold (the first one is usually around 50 $) or 30 days after your last automatic payment, whichever comes first.
In this case, a useful tip would be not to make payments yourself before the system will attempt to charge your card (it’s possible though) because it can be confusing in terms of how much you already paid and how much you owe to Google.
If using automatic payments, after entering “billing and payments” menu, you won’t see a clear amount that you have on your balance (like you do in manual payments), but your payment threshold and a blue line that will start to fill up as you spend the money.
The situation gets even worse when you enter the “transactions” menu on the left. The amount of money that you’ve spent will be marked as ‘+’, and the amount that was charged will be seen as ‘–‘. It’s the other way around in the manual payments system.
The creation of the campaign
And now, finally, after completing all the necessary steps and formalities, we’re ready to create a search campaign itself.
So you’re in the Google Ads user interface. At this point, to avoid any further misunderstandings, let’s answer a simple, but very important question. How do you know if you’re in the right place?
The answer is the following. First of all, you must see a wrench icon at the top right corner of your screen (for now, I’m using it as a reference point only), secondly, you must also see the three horizontal lines at the top left corner of your screen.
Understanding the user interface
If you click on them, most probably, a black navigation panel will show up on the left side of your screen (supposing it was not open before) with writing that says “all campaigns” at the very top.
This part is very important for you to understand because in the new Google Ads user interface (yes, it was changed not a long ago) everything is based on these 2 panels that you must be seeing.
I mean the black one and also a grey one that says overview at the very top. (On some bigger screens, you can see both of the columns at the same time, while on laptops, you usually have to open and close the black navigation panel).
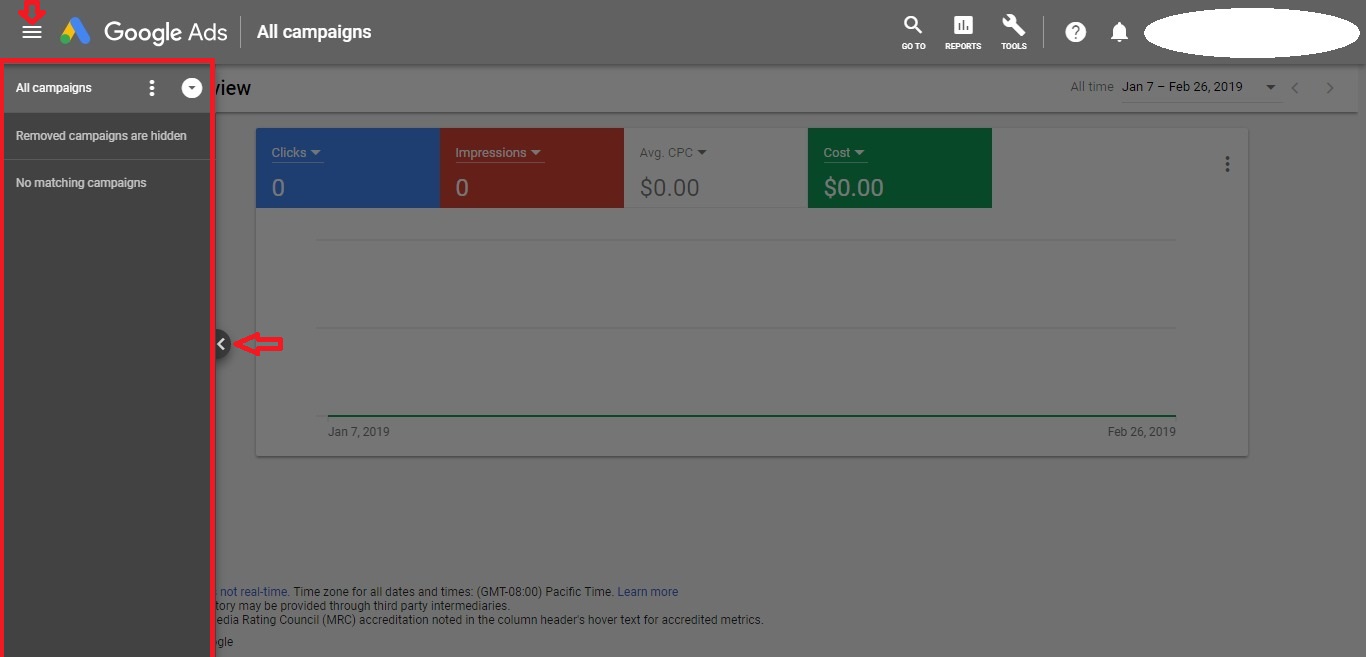
Why is it so important to remember? The answer is simple. In that black column, we always have to choose a level, that we’re working with.
It can be the account level (all campaigns), a campaign level (the name of your campaign that will appear a bit lower after the creation), and finally, an ad group level that will show up after clicking on the name of your campaign and a corresponding icon that will be visible to the left of the campaign name.
After selecting the proper level, we then go to the grey column to specify what exactly we want to set up in it. (For example, it can be settings, ads and assets or keywords).
Let’s create a campaign!
Obviously, so far we don’t have any campaigns, that’s why we choose “all campaigns” level and then select “campaigns” in the right (grey) column. After this, press the blue round button with a plus sign on it.
(Almost everywhere in the Google Ads interface, you click this button when you want to add something). Then choose “+new campaign”.
After this, a system will show you a list of 6 goals that you may want to achieve with Google ads.
First of all, I want to tell you that these goals just help you to choose the right campaign type and its settings which in turn may help to increase the performance depending on what you want, but that’s it. When the campaign is already working, these goals don’t mean anything at all.

As you have an experienced guide with you, I highly recommend you to select “create a campaign without a goal’s guidance” option because we will don’t need any additional help from the system’s side and will select the proper settings ourselves.
The next thing you’ll see is the list of all campaign types that are available in the Google Ads system. There are five of them and I’ve talked about each of them in my previous article about the various types of ads on the internet. For now, let’s choose the first one that says “search”).
In addition to that, I also suggest you ignore the selection of the results that you want to get from this campaign because it will definitely mess up your settings that we don’t want. After this just click “continue”.
What you will see next is a long page with a lot of different tabs. These are all the settings of your future campaign that we will now discuss step by step.
The settings of your campaign
Networks
Well, at the very beginning, we see the ”general settings” section. The first thing you need to do here is to give your campaign a name.
Although it doesn’t affect the performance in any way, you should better do it because it will add some structure and increase the overall understanding of what is going on in your account, especially, in case you have several campaigns in the future.
In the following “networks” tab what I recommend you to do is to uncheck the “Google display network” square.
The GDN is definitely a very powerful type of campaign that I’ve already talked about in the article about types of ads and will also talk about in a separate article but the problem is, that these 2 types of campaigns are absolutely different, have their own targeting options, etc.
That’s why to be able to better track the performance of your search campaign, it’s highly recommended to turn it off here and later create a separate display campaign.

As to the “include Google search partners option”, you can leave it on because these partners include a pretty extensive list of huge websites like Amazon, The NY Times, The Guardian, etc., where people can also perform searches and see your ads in the same way they see them in the search engine results page.
In my opinion, you absolutely should not be scared off by this type of traffic because it also can be of pretty good quality. But if your budget is very limited and you want your ads to show in Google search only, then you can uncheck it too.
Let’s move on. A bit lower we have a blue link with an arrow that says “more settings”. The only thing that can be important for you here is the start and end date (in case you’ve planned to run your campaign for a limited time only).
The menu is very self-explanatory. Correct the start date if needed and just click on the blue circle and select the end date in the calendar that will show up.

Regarding the 2 other options in this “more settings” menu, then I have to say that they’re pretty advanced and are absolutely not necessary to use. The first one that says “Campaign URL options” is for those advertisers who want to use their tracking templates in order to track their campaign in other, 3rd party services (especially, when their website has several paid traffic sources).
As to the “Dynamic search ads”, this option can be useful for advertisers with huge websites (we’re talking about thousands of pages) who don’t have time and desire to create their own ads for every product or page and ask Google to create ads for them based on what the user is searching.
The weak point of it though is that as a rule, the system needs a lot of indexed pages to be able to start working.
Locations
The next menu is called “targeting and audiences” and has 3 tabs inside of it. Let’s start with the most important one, that is “Locations”. By default, the system will select the whole country of your payments profile, but in many cases, business owners want to target specific regions, cities or even parts of these cities.
If it’s your case select the blue “enter another location” circle and start entering the name of your region or city in the field below.
After you see the appeared prompts, click either “target” or “exclude”. Moreover, I’ve also mentioned the fact that one can target only some parts of the city or a region. To do it, press the “advanced search” button and then select “radius” circle. First off change miles to kilometers if needed and type in the name of your location.
The map on the right-hand side will show you your targeted locations. Click “save” to continue. Some of you may think that we’re done with the location targeting, but it’s not true. We have one more important option ahead of us. Sure I’m talking about the “Location options” link.
There we have a “target” and “exclude” menu with several options underneath. The fact is that many people skip these settings and leave it as they are. The problem is, that by default, the system can also show your ads to people who are not necessarily physically located in your targeted locations but just show interest in them.

It means that, if you’re targeting NY but a person is in L.A and is searching for your keywords and also shows interest in NY by adding relevant keywords to his initial query, such a person will see your ads. I should say that it can be both good and bad, depending on your business model.
For example, if you’re a small local business, you don’t want people from all over the country or even worldwide to see your ads because most probably, they will not buy from you. In such a case, I recommend you to select “People in or regularly in your targeted locations” in the “include” section.
As to the “exclude” section, leave the first recommended option if you have some excluded locations and you don’t want to hear anything about them (both about people from them and people who just show interest in them), and select “people in your excluded locations” to exclude traffic from people, who are physically located in these locations (but this will not exclude people who show interest in them when performing a search from somewhere else).
I know, it may sound a bit complicated at first, but in reality, it’s pretty easy if you think about it.
Languages
Let’s move on to languages. And again, it may seem very easy and straightforward, but there are also some interesting facts about them. For example, in case you’re targeting non-English speaking countries and users. Let’s say you’re targeting Sweden.
If you just select the Swedish language in the settings, you may miss out on some traffic because many people in Sweden speak very good English, and what’s more important, use devices and browsers with the English user interface. Moreover, they can use the original “Google.com” domain name when performing searches instead of the country domain “Google.se”.

That’s why, to sum up, it’s always better to choose all the country’s main languages plus English, and other possible languages.
Moreover, I don’t recommend you to select “all languages” simply because of the fact, that the Google Ads system always works better when you do your best to specify what exactly you need and who you want to target because otherwise, the system just doesn’t know it.
Audiences
The last tab in the “Targeting and audiences” section is called “audiences”. Generally speaking, this tab is very rarely used by most advertisers in this type of campaign because search is all about keywords (that we will definitely talk about a bit later) and audiences are all about display network.
Nevertheless, everything keeps evolving and now we also have audiences in search. In short, audience targeting takes into consideration people’s interests and behavior.
When we layer these interests on traditional keywords, we greatly limit our reach, but at the same time, can get some visitors who are really interested in what we’re offering. But in order to make this work, you usually need to have a broad keyword and location targeting.

So if you want to layer on people’s interests, select “what they are actively researching or planning” in the table that opened and then tick the needed interests. (You can open them more and more by clicking on the down arrow at the right).
There is also a possibility to add the list of people who have visited your website (remarketing list) to the search campaign if you choose “how they have interacted with your business” menu in the same table below.
As to the targeting and observation settings, when you select “targeting”, you tell the system that it should definitely consider all the settings that you’ve selected (in other words, people who’re interested in something or are on your remarketing list should also enter your keywords in order to see your ads).
And if you select “observation” setting, you don’t narrow your targeting but observe how all your targeting options work independently from each other and which of them are more effective for you.
Budget and bidding
Budget
The next section that we’re going to talk about is called budget and bidding. Obviously, this part is crucial for everyone. So the first tab in this section is “budget”. It’s the amount of money that you are ready to spend daily.
But just like in other parts of the Google Ads user interface, there is also something more to mention when talking about the budget.
If you take a look at the right side of your screen, you will see some explanation that convinces you that at the end of the month, you will not pay more than your daily budget times the average number of days in a single month.
So what does it mean? Here Google wants to warn you about one pretty unpleasant phenomenon which is called “overdelivery”.
 It means that you should not be overwhelmed if you suddenly notice that the system has spent up to 2 times more money in a single day than you’ve entered in the budget field. Pretty strange, right?
I totally agree with you, but the reason for this is that when we’re working with internet traffic, we should understand that it almost never can’t be permanent. I mean in every niche users are always more active on certain days because of a number of reasons.
Therefore, the system can’t spend the budget evenly during the month. This results in the fact that on some days we can spend more and on some days less. But what’s important, is that at the end of the month, you will not spend more than your planned monthly budget, which consists of your daily budget times 30.4 (Average number of days).
Yes, I understand that it can be pretty annoying but that’s how it works. There are no official ways to make it not happen, but nevertheless, there are things that you can do to try to avoid it. Generally speaking, there are several settings that can trigger the system to spend more.
We’ve already covered one of them and will talk about other ones later on when we reach this topic. So the first thing you should not do if you want to avoid overdelivery is set “accelerated” delivery method. I hope that we’re clear on that.
Bidding
The next tab that we’re going to talk about is called “bidding” and I can’t stress enough how important it is. That’s because here we need to choose the bidding strategy which will be used in order to allocate your budget and show your ads. There are 9 bidding strategies in Google Ads and as I’ve mentioned, they influence the way the system spends your money.
If you’ve followed my advice and started to create a campaign without a goal, most probably, you will see the “maximize clicks” strategy set up by default in your account. (“Clicks” are selected in the “what do you want to focus on” field).

If you’ve selected some goal in the very beginning, you can see a different strategy. If you click on “clicks” you will see several more options such as conversions, conversion value (they are unavailable so far because we haven’t set the conversion tracking yet) and impression share.
For now, let’s close them and click the “select a bid strategy directly” link a bit lower. After this, click once again on the name of your current bidding strategy that is “maximize clicks”. Now you see the whole list of the available strategies.
8 of them are automated and one is called “Manual CPC”. The next thing that I will do is to provide a description of the most popular of them, explain in what situations you may want to use it and how they work.
Manual CPC
So let’s start with the easiest one, which is “Manual CPC”. This strategy is for those advertisers, who know the exact amount they both want and need to pay in order to win auctions and have their ads on spots in search that they are satisfied with. How do you know the exact cost of a click that you need to select if using manual CPC?
Generally, it comes with experience and good knowledge of your market. You can see the approximate prices in the “keyword planner” tool by clicking on the “tools” icon (then “find new keywords”) but the information there is based on the auctions that were taking place during the last year.
You should also realize that prices can change very quickly. One more huge advantage of this strategy is that when using it, you can set bids on both the ad group and keyword level (every single one of them). If you have different bids on these two levels, the system will take into consideration the bid on a keyword level and ignore the one which is set at the ad group level.
Maximize clicks
The second most popular and pretty simple strategy is the one we’ve already seen which is called “maximize clicks”. When you select it, the system will also inform you about setting the “maximum CPC bid limit”.
In the interface, it’s written that it’s optional, but I highly encourage you to set it to avoid extremely expensive clicks and overdelivery.
Yes, we’ve reached the point where I inform you about the second setting that can trigger this phenomenon. Usually, your maximum CPC should be 10 times less than your daily budget.

The biggest advantage of this bidding strategy is that it will adjust bids on a keyword level itself and you can be sure that the amount you pay per click is the exact amount that is needed to outbid your competitors, but not more than the limit that you’ve selected.
This strategy is highly recommended by Google, especially for those advertisers, who’re just starting out, need more understanding regarding the prices in their niche.
Moreover, it’s considered to be a good practice to set up a conversion action after turning the strategy on and then accumulating these conversions in your account in order to be able to use more advanced bidding strategies in the future.
By the way, I will also explain to you what a conversion is a bit later because otherwise, we will not be able to understand the work of other bidding strategies that are left, except for the next one.
Target search page location
The name of this strategy speaks for itself. It’s for those people, who certainly want their ads to be shown either at the top of the 1st search results page or at least anywhere on the 1st results page.
There is a possibility to set bids on the ad group and keyword level but the system will adjust them if they’re too low to show ads as high as possible.
It’s important to mention that this strategy doesn’t guarantee a specific position all the time. It will just try to win more auctions.
Personally, I don’t suggest using this strategy too often because all experienced marketers will confirm that generally, the specific ad position (even the first one) doesn’t guarantee you good results from advertising.
What is a conversion? Conversion-based strategies
It may seem difficult at first but the conversion is just any desired or useful action that a person (your potential customer) can take on your website. For example, it can be a phone call, a filled lead form, or a sale.
I will cover the whole process of setting up different types of conversion in a separate article on my website because the topic is really extensive and pretty advanced.
Furthermore, it may become even more complicated when setting the conversions in Google Analytics because of the flexibility of this product and a big number of settings (Nevertheless, this way is highly recommended).
At this, point you need to understand that other bidding strategies, that we haven’t covered yet, are all based on the accumulated conversions in your account. As I’ve mentioned, after setting up the conversion and turning on the campaign, you should let the system accumulate some conversions in order to be able to understand which actions on your website are important for you.
After this, the Google Ads system will do its best to show your ads to those people who’re most likely to complete this action or make a conversion.

This process is pretty complicated and is based on machine learning. The system analyzes people’s behavior on the internet with the help of files called “cookies” (files stored on your hard disk and being saved when visiting websites).
I would say that it’s a well-known fact that Google’s algorithms are really advanced and intelligent which helps the advertisers to get pretty big amounts of conversions.
The only disadvantage is that due to the complexity of the process of finding potential users who’re likely to convert, the system needs time to learn (depending on the type of strategy, this period can last up to several weeks).
So now as we already know what conversion means, we can start talking about other bidding strategies.
Enhanced CPC
Generally, perhaps this should not be treated as a separate bidding strategy but more like an addition to your manual bids.
It means that a system may raise bids from time to time in order to try to get more potential customers to your website and also keep the price of a conversion equal to that you have with manual CPC.
If the conversions are set up, you can select “enhanced CPC” directly from the list of all strategies or choose either “manual bidding” or “maximize clicks” and then tick “help increase conversions with enhanced CPC” option underneath.
Maximize conversions
The goal of this strategy is the same – show your ads to people who are most likely to take an action that you want them to take. The difference is that you can not set up bids at the campaign, ad group, or keyword level.
The system will take care of it itself. The fact is that in this case, you may be sure that the system will spend all your budget.
Target CPA
When selecting this strategy, the system will ask you to fill in the target cost per acquisition, or in other words, the average amount you want to pay for a conversion.
It doesn’t mean that all the conversions will cost exactly the same, but the system will do its best to set bids in such a way in order for the average cost to be like you’ve selected.
Generally speaking, this strategy is considered to be very effective for those advertisers, who have some experience, statistics in their accounts, and a clear idea of the amount of money they want to spend on a user who may become their customer. Please take into consideration, that you don’t pay for conversions only.
So now we’re finally done with the bidding strategies but have a couple of more relatively simple settings to cover in the “budget and bidding” section. Click on the “show more settings link”.
Ad schedule
This particular setting is one of those that you can’t set up wrongly. Just select on which days and at what time you want your ads to run.
I must admit that if your business has some physical location where people come to, ad schedule makes great sense and you should not ignore it.

Why would you need people to call you outside of office hours? Please keep in mind that the ad schedule is based on your account’s time (The time zone that you’ve selected when creating the account).
Ad rotation
And one more setting which is pretty easy to both explain and understand. As you probably know, in internet marketing, you should always keep testing everything. After all, your ads are the most important part of your advertising campaign because that’s exactly what is appearing in front of people’s eyes.
We will talk about the creation of an effective ad itself a bit later on, but now we have to discuss the setting which is very closely related to ads, that is ad rotation.
Basically, it means that the system suggests you test different ad copies that you have in your ad group, find out which one is better, and show it more often in order to increase the performance. (We’re talking about the “Optimize: prefer best performing ads” option now). Sure you need to have several ads in order for this to work.

By the way, the recommended amount is a minimum of 3 per ad group. Just try to paraphrase the same info by using different words either in the title or description. But stop, we’re already running a few steps forward.
As to the second option that sounds “Do not optimize: Rotate ads indefinitely”, it’s for those people who don’t need Google’s help and want to test the performance of their ads themselves.
From my point of view, we shouldn’t refuse the offered help in this particular situation. So it’s better to leave the first default setting selected.
Set up ad groups step. Why do we need it?
Then we click on a blue “save and continue” button and are being directed to the next step where we need to set up ad groups. At the very beginning, make sure that the “standard” ad group type is selected because as we’re briefly discussed earlier, “dynamic” ad group or dynamic search ads is a pretty advanced feature that creates ads and chooses keywords automatically by scanning your landing page.
But just like most advertisers, we will choose our keywords and create ads by ourselves. (By the way, it’s a recommended way of doing it).
Before going further, I want to explain to you why we need ad groups in our campaign in the first place. The answer is that we need them for grouping different keywords and ads based on the product or service that we want to advertise.

You need to understand that for Google as a search engine, relevancy is the first and most important factor when deciding what ad or website to show when a person is typing his request in the search bar and clicks search.
Just like with regular organic, free search results, the first thing that Google does is scan the headlines and descriptions and looks for the keywords being searched by a user.
Of course, there are many other factors that influence the final results, but this process is truly fundamental because, in spite of Google being more and more clever these days and starting to have an intellect, it’s still a robot, a.k.a bot.
So you definitely need to have several ad groups in case you sell or offer several types or varieties of physical products or services in order to put keywords in them and then create ads for those keywords specifically.
In this case, when a person has typed in a keyword, Google will easily find the relevant ad to show which, most probably, will make the user happy with what he sees. After this, there is a very good chance of the potential customer clicking the advertiser’s ad, going to his website, and if he likes what’s there, then making the desired action.
In case you only have one ad group in your campaign (like many beginner advertisers do), the system will show the ads which are not so relevant to the search term, which will result in a low clickthrough rate, dissatisfaction for both the user and advertiser.
(Running a few steps forward, in order to create more ad groups, just click on the blue “+New Ad Group” button under the white space for keywords that we will also cover in a moment).
Let’s set up ad groups
So now I hope that now you do understand the importance of it and we can move on.
If we go further down the page, after the ad group type, the next field that we must populate is the “name of an ad group”. I really recommend you to name your ad group according to the type of goods or services or, at least, the way you know and remember what is being advertised there because when the campaign is ready, default ad group names such as “ad group 1” can make you really confused.
After this, you can type in or paste your keywords in the white field below, so that one search term (it can consist of one or several words) is in a separate line. There are several ways of doing it. For example, you may already have a ready list of keywords somewhere on your computer or you may enter keywords from your head if you know your product good enough.
Another option is to enter the name of your website in the appropriate line on the right which will make the system scan your website and suggest you keywords based on it.
Finally, you can type in one of your most relevant keywords in the “enter a product or service” line. After this, if you find the suggestions relevant and useful, add them to the list of your keywords which is on the left by simply clicking on them.
Keyword research and a keyword planner
By the way, by looking at the suggested keywords, you can see that the system also informs you about the average amount of monthly searches for every keyword.
So far you can only see the range (for example 100-1k or 1k-10k), but when you finish the creation of your campaign and run it, you will be able to see more detailed statistics by launching a very useful tool inside the Google Ads interface which is called a “keyword planner”.
You can also open it right now by clicking on a “tools” button at the top of your screen and then clicking “keyword planner” at the left. (It’s better to do it with a right mouse click by opening it in a new window). Finally, choose the first option “find new keywords”, enter one or several of your most important keywords in the appeared line and click “get started”.
 After this, you will see a big list of keywords that are also relevant to those that you’ve entered with entered keywords being at the very top. I must admit that it’s a great way of finding new keyword ideas, I mean those ones, that you haven’t even thought about but nonetheless, people are searching for them.
I also suggest you not be discouraged by the relatively low search volume of some of the keywords because you need to understand that so-called long-tail keywords are very valuable and constitute a huge percent of all searches on the internet.
They’re important because they consist of 2+ words and it means that when a person searches for them on Google, he’s pretty well aware of what he needs and is relatively close to the final decision.
So even if a keyword has only several dozen searches per month, I suggest you not ignore it. Unlike long-tail keywords, short keywords that contain only one word are usually informational and in most cases will not bring you paying customers.
One more useful thing is that in addition to the average search volume (by the way, the data is for the last year) you can also see the average cost of a click and the level of competition. If it’s high, then it means that there are other advertisers who’re also bidding on these keywords.
Obviously, it will be lower for the keywords that few advertisers are aware of, which means that it makes perfect sense to dig deeper when performing keyword research with the help of a keyword planner.
 Another suggestion would be typing different phrases and their variants into this tool because it works in such a way, that it can show different results when doing it. This tactic helps to discover even more potentially valuable keywords.
And one more important thing. Please don’t forget to check the “locations” and “language” settings at the top of the page because you may need the stats for a specific town or region, but not the whole country.
So now you think that we just can paste the discovered keywords into the white field and that’s all with keywords.
Well, it will surely work like this but you may be a bit dissatisfied with the results of your campaign after some time because, unfortunately, there is one more important setting that concerns keywords directly and the way the system spends your hard-earned money. So let’s talk about it!
Keyword matching types
When you’re entering keywords into the mentioned field, the system tries to briefly educate you on the phenomenon of the same name by mentioning a couple of examples of how the keywords may look like when they’re in broad, phrase or exact match.
The problem is that these examples don’t explain to you how exactly the whole thing works and what to expect from these 3 types of settings. Obviously, there is a standard blue “learn more” link right next to those examples that opens up a more detailed article in the help center but let’s be honest – not all people open this article when creating their campaigns for various reasons.
Broad match
As I’ve already mentioned a bit earlier, after some period of time advertisers start to notice that traffic that is coming to their website is not as targeted as they would like it to be. And in most cases, the reason is that like most of the other people, they haven’t read that article and have entered their keywords without any additional symbols, in other words, in “broad match”.
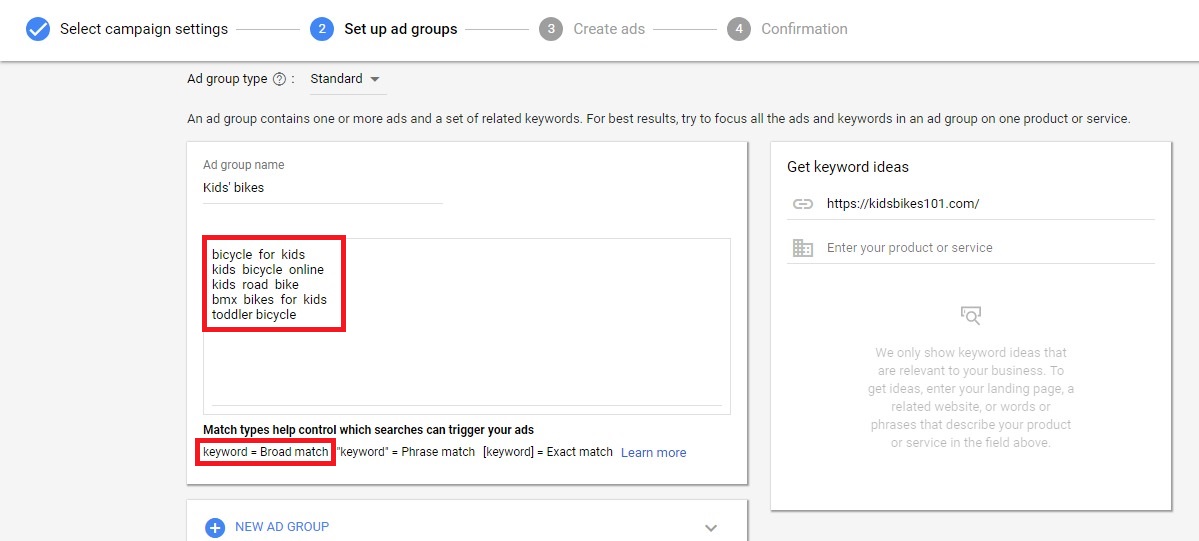
This match type works in such a way that it does its best to show your ads to the widest audience possible. In practice, it means that the system can do a lot of various manipulations with your keywords by adding other words that it thinks are relevant, change the word order, word forms (by the way, misspellings are also included), and so on.
From my experience, I can say that I’ve seen cases where it worked pretty well (for example, in combination with smart bidding strategies), but unfortunately, you can easily get into a very unpleasant situation, especially when the keywords that you’re targeting can mean different things depending on the context. That’s why I would not recommend using this match type to most of the advertisers, especially if you have a tight budget.
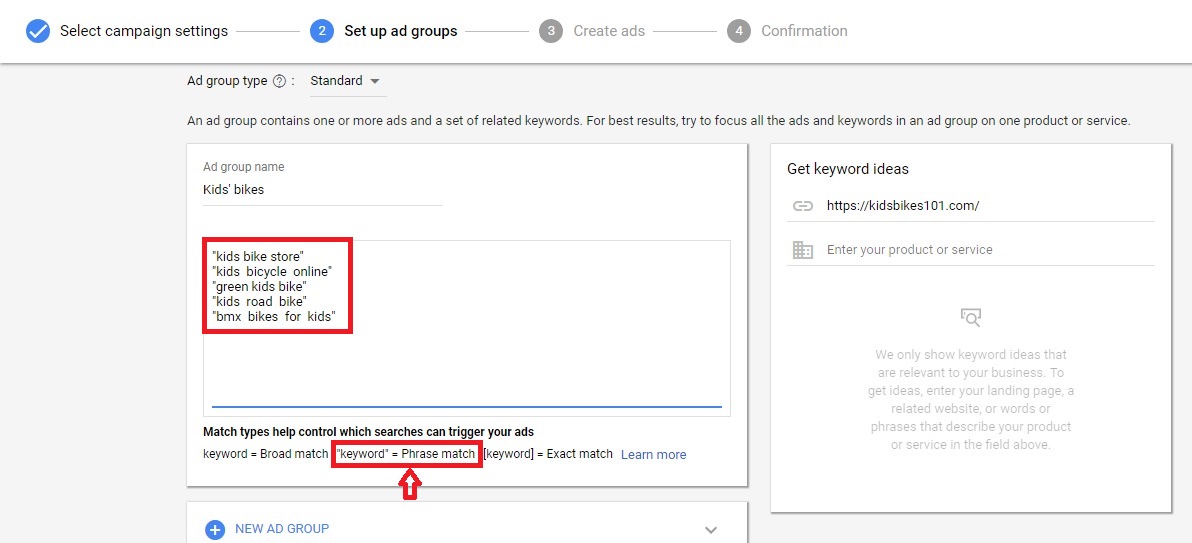
Phrase match
The second matching type is called a “phrase match” and it puts the keywords in “quotes”. It works the following way. In order for your ad to be shown, the user should enter keywords that include the meaning of the keywords that you have in your account but can also add any other words or phrases to them.
The order of words in quotes can change, however, only in cases where this doesn’t change the meaning of the query. Please note that the ads can also be triggered in cases where the query doesn’t contain your exact keywords at all, however, the general meaning should be preserved. I must admit that it’s a pretty effective matching type that can bring you very targeted traffic.
Sure there still is a possibility of some irrelevant words slipping through but in order to prevent it, you need to regularly analyze “search terms” and add negative keywords if needed which we will cover in the final part of this article.
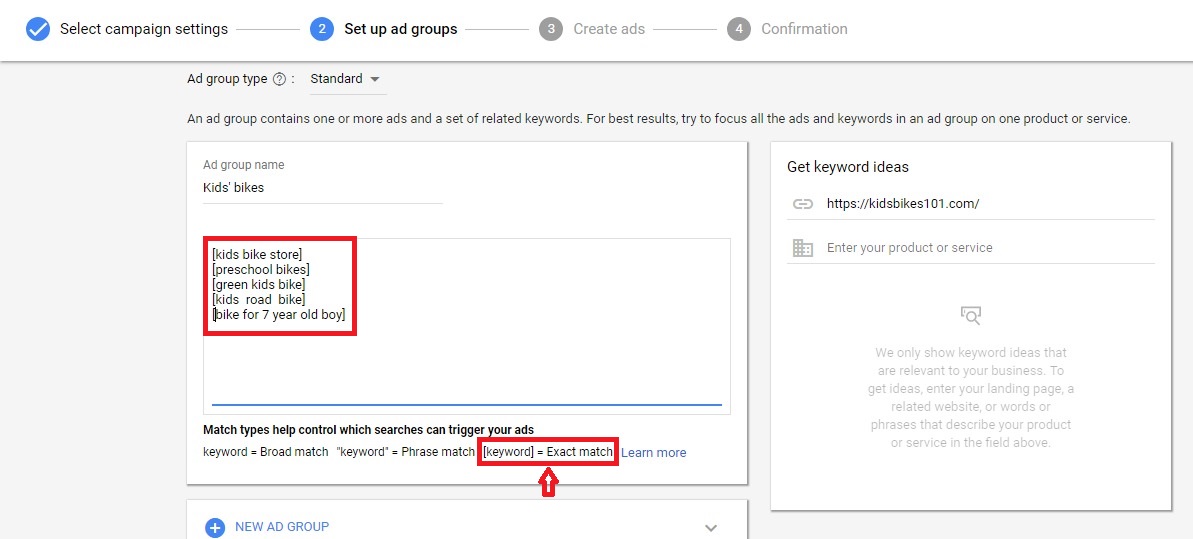
Exact match
The next match type is exact. When keywords are in this matching type, they’re in [brackets]. From its name, it’s pretty easy to guess that it limits the system as much as possible, but nevertheless, it doesn’t mean that person must enter these particular keywords in the same exact order.
In some instances, the system can slightly change the words, their order and even use synonyms, but only if it’s sure that the user is searching for what you’re offering. Generally, I highly recommend using this matching type but I also want to warn you that in this case, you need to be very patient.
Do you remember us talking about the search volume, not long ago? So when you’re using an exact match, you should realize that although the traffic is very targeted, we’re more limited by the search volume of the chosen keywords which can be low or unsteady from day to day, week to week, or month to month which is an absolutely normal thing.
One more potential disadvantage for some people may be the fact that you will probably need to spend a lot of time on your keyword research in order to find the necessary amount of keywords which, in one’s turn, will generate a decent amount of traffic.
It was the last matching type and I hope that now you understand how they work and which one to choose in order to show your ads to the relevant audience.
The importance of matching types
I also want to admit, that this will not only save your budget but also increase the overall performance of your campaign.
Do you remember us talking about creating several ad groups and thus making the keywords relevant to ads a bit earlier? The wrong matching type can lower your CTR because if your ad is shown for some irrelevant keywords which were automatically added or chosen by the system, the user will probably be unsatisfied with what he sees in the ad text itself and won’t click the ad.
(By the way, the CTR plays a huge role for Google because it shows if a customer likes what he sees or not). And even if for some reason, he decides to click it, you will just waste your money.
At this point, as I’ve already mentioned earlier, if you need several ad groups (and you probably do) click the “+New Ad Group” button which will add one more section with the name of the ad group and white window for keywords.
And now, finally, we can hit “Save and continue” and move on to the creation of what our potential customers will actually see, which is the ad itself.
Ads creation step
The page that you’ll see next is relatively simple and is not overloaded with many settings. Obviously, as it’s a search campaign, we have to create a text ad. The first line is a “final URL” which is a page on your website that you want to send the visitors to.
If you have a pretty big website with a lot of pages for specific products or services, then it makes great sense to link to them from your ads, but not just to the main page.
As you may guess, just like creating several ad groups, it will help to make your ad more relevant to what the user is searching for, that is his keyword. In one’s turn, the website visitors will less likely quit your landing page right after visiting it.
As you can see, one of the main rules in Google Ads is to try to make the connection between a keyword, an ad, and a landing page as tight as possible. If you follow this simple rule, your keywords will have a good quality score, which is a very important metric inside this system.
I also want to mention one more important thing about the final URL. The problem is that as Google actively promotes using so-called SSL certificates these days, the system will automatically populate the beginning of the final URL field as “https://”.
Nevertheless, advertisers are not required to have such a certificate to use Google ads. It means that if you don’t have it on your website, just delete the “s” and leave it as a regular “http”.

As to the next fields which are “Headline 1, 2,3”, “Description 1,2” then it’s obvious that you just need to fill them. By the way, the 3rd headline and a second description are optional and are not displayed all the time.
This feature is pretty new and was designed to help advertisers make their ads even more informative. Generally, I suggest you fill all the lines to make your ads as appealing to your potential customer as possible. Don’t be lazy, take your time, don’t try to do it all at once.
You may not realize it, but experienced marketers spend a lot of time testing different ad copies by changing the wording, adding adjectives that trigger people’s emotions, and so on. Sometimes even a minor change can drastically increase your CTR and conversion rate. This leads us to the next recommendation – create a minimum of 3 ads per ad group.
These ads should not necessarily be completely different but must differ one from another, at least slightly. I suggest you put the same thoughts into a bit different words.
The thing is that people will definitely find some of them more appealing and that’s why will click on them more actively. The system will realize it and then activate the “ad rotation” that we’ve already covered in this article.
As for the “display path” line. It’s also optional and you can use it in case you don’t like the real URL of the page that you want to advertise. Your ad will still send people to your actual page, but the visible URL will be different.
Just like we’ve covered it when talking about the campaign settings before, “ad URL options” lets you put your own tracking template, but in this case, at the ad level. If you don’t know whether you need it or not, just leave it blank and forget about it.
Finally, you can see how your ad will look on the right side of your screen. By default, you see the example on the screen of the mobile device, but if you click on the right arrow above it, a more traditional, computer version of your ad will show up.
Do you like your ad? Would you click on it if you were a customer in search of what you’re offering now?
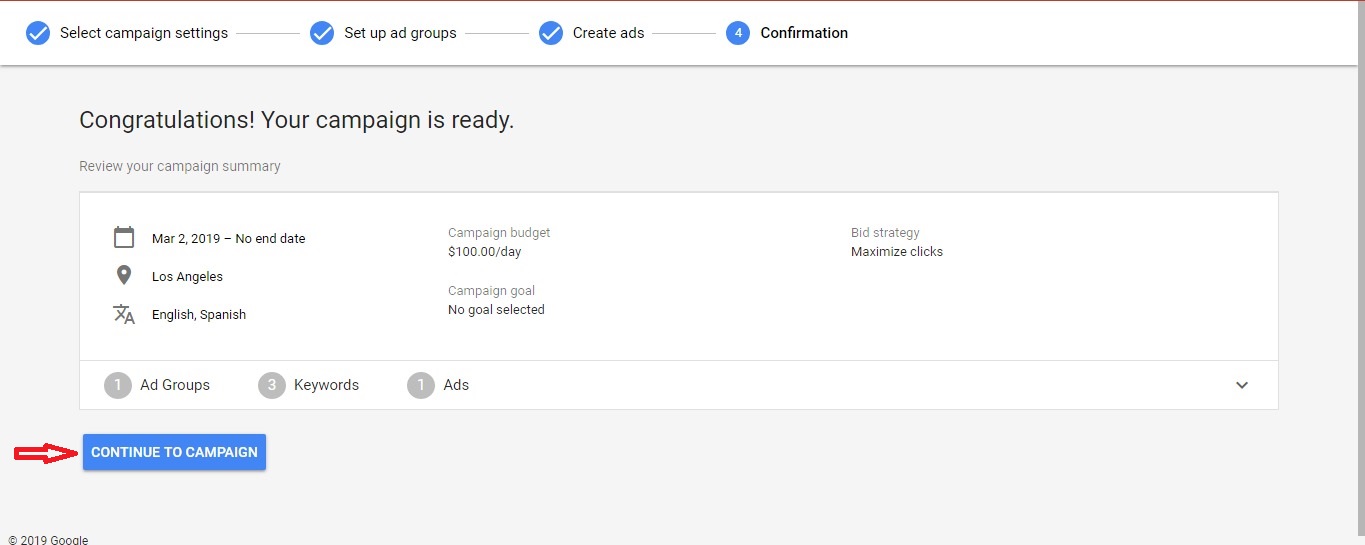
If yes, then please accept my congratulations. You’ve almost finished the creation of your Google Ads search campaign and done it yourself. The 4th stage is called “confirmation” and you will not be able to change anything there because it just summarizes some basic settings of the campaign.
Now you can click “continue to campaign” button and the system will take you back to the Google Ads interface that you must be already familiar with. The only difference is that in the left, i.e. black column, under the words “enabled and paused” you will see the name of your campaign and a magnifying glass sign to the left of it.
Your campaign is already ready to run with only a few small things to be added and checked which I will talk about in the final parts of this long article.
Final steps. Ad assets (Former extensions)
Although assets are kind of optional and some people may think that they’re not so important, I would highly recommend you set them up because numerous experiments show that the system takes them into consideration when defining the general ad rank and how high to place your ads in comparison to your competitors.
To be honest with you, it makes perfect sense to me personally. Google’s mission is to provide users with the best and most complete information possible as fast as possible.
By fast, I mean that ideally, a customer should not spend too much time clicking tens of links (doesn’t matter if they’re ads or organic search results) and visiting tens of websites in order to find what he is searching for.
He should be able to find it by clicking on the 1st couple of results. And in order to make the right decision and choose the proper ad, he needs as much preliminary info as possible. That’s exactly what assets do. They make your ads more informative, rich and visible.
 In order to add an asset, first, choose your campaign in the left (black) column and then choose “ads and assets” in the grey column (it starts with “overview”). After this, click on “assets”.
If you enter this menu for the first time, the system will show you the 3 most popular extensions with their strong points and examples. (Sitelinks, callout, call).
You can either click on one of them or click the blue “+Create Ad extension” menu which will open the whole list of available extensions. As you may guess, the most popular and frequently used ones are listed at the top.
For example, sitelinks are shown as blue links under the description. The point is that the user can go to some internal page of your website directly from the ad.
The most popular and effective sitelinks lead to such pages as “contacts”, “about us” which almost every business has or should have.
Clicks on the sitelinks, just like other assets, are charged as a regular click (but maximum 2 clicks per 1 impression).
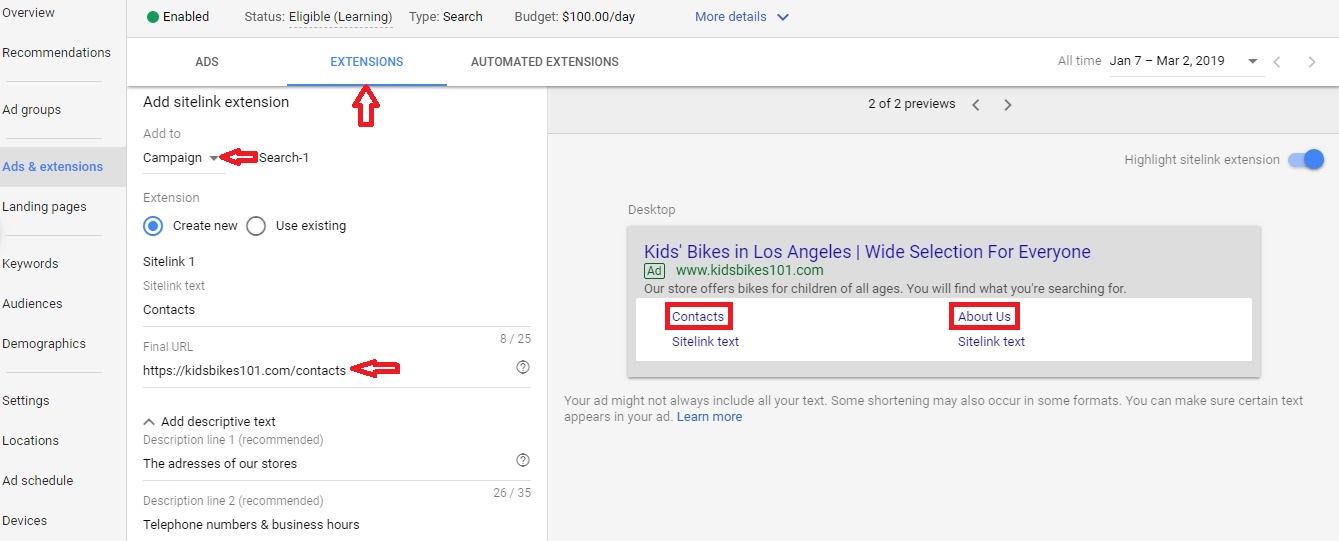
It’s recommended to have about 5 sitelinks. The process of the creation is pretty straightforward and I don’t think you will have some problems with it.
The only recommendation is to put final URLs that actually lead to a different page on the website. Just writing some text that differs from the rest of the ad but linking to the same page will result in the asset not working.
Callout asset is also shown under the description in the form of short words and phrases that are separated one from another with a hyphen. Usually, these phrases should specify the products or services that you’re offering. (Free shipping, 24h support, etc).
Take your time and fill as many lines as possible and try not to use the text that you’ve already used in other parts of the ad.

If your business model implies customers calling you, then a call asset is simply a must. In this case, your number will be shown right near the headline.
A person can either enter the digits manually or click on the number from his mobile device which will open the phone app. After this, the client should only press the green call button and the phone will dial the number.
The last universal asset that I recommend setting up as it’s also applicable to almost every business is a structured snippet asset. It’s also an additional text, but more extensive than a callout.
When creating the extension, you need to click “select header type” and choose something that best fits your specific business from the appeared list (Amenities, models, service catalog, etc.).
After this, list the amenities, models or services you offer by typing in the corresponding values. The most important thing here is to use such words that really coincide with something which is selected in the header type. Otherwise, the asset may be disapproved and not work.

So these were the assets that I highly recommend you to have in your account. As to other ones, you can also use them if you feel that they’re relevant to your business.
Generally, it’s recommended to have as many different assets as possible because you should take into consideration that the system will rotate them which means that not all of them may be shown at once.
This can be easily explained by the fact that if all advertisers would have all possible assets in their ads simultaneously, then the ads would have simply taken too much space on the search results page.
And one more important thing that applies to all possible assets. When you’re creating it, at the very beginning the system asks you where it should be added to.
There are 3 options: Account, campaign, and ad group. Usually, it makes sense to add assets to the whole campaign but in case some of them don’t correlate with all products and services in some of the ad groups, then adding it to the ad group level will solve the issue.
General suggestions. Campaign monitoring
So now the creation of your search campaign is complete. In this final part of my article, I will give you several general recommendations that will help you to monitor the work of your campaign.
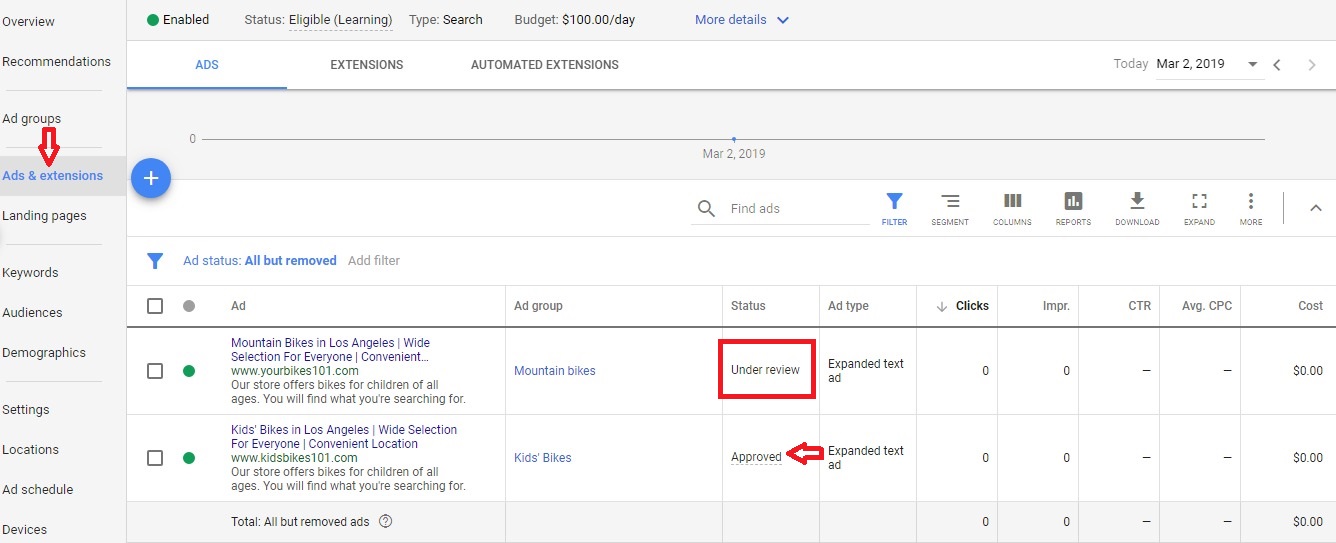
First of all, make sure that your campaign is on at all levels. What I mean is that the campaign itself may be on, but either an ad group or ads may be off which will result in the campaign not working.

While on the subject of ads, you should control their statuses. If the ad is under review or disapproved, they won’t serve as well. An ad can be under review for a maximum of 24 hours.
If the ad is disapproved, you must recheck it and make sure that both the ad text and your landing page comply with all Google Ads policies. (You can find them in the official help center articles). By the way, keep in mind that ad assets can also be disapproved.
One more important thing to keep in mind is that the reporting in the Google Ads system (just like pretty much in all other products) is not real-time. It means that your ads may already show but you will see the stats only in a couple of hours.
By the way, you can see the number of clicks and impressions at different levels of your campaign such as “ads and assets”, “keywords”, or even “devices” (in this tab you can also increase or decrease bids for certain devices with “-100” meaning that the ads will not serve on this device at all and “+100” meaning that you will pay 2 times more for a click than you’ve originally selected when the ad is shown on this particular device).

But the first place you should go to is the first tab in the grey column which is named “overview”. Here you will see all the necessary stats from your account gathered in one place which is very comfortable.
In order to avoid potential issues with seeing the stats, make sure that you’ve selected the correct campaign in the black column at the left (if you have several of them) and the proper date range in the top right corner of your screen.
One of my final pieces of advice concerns the most important thing in every search campaign which is, of course, your keywords. I highly recommend you regularly enter the keywords tab and then check the “search terms” menu at the top.
As we’ve discussed in the section about the matching options, depending on the matching type that you’ve selected, various combinations of keywords and phrases can trigger your ads.
In this tab, you will see the real search terms that people were typing in before seeing your ads.
If you look through them and see something that you either don’t like or don’t need at all, then simply mark this keyword or phrase and add it as a negative keyword. Keep in mind, that automatically the system adds it in the exact match which means that only this exact variant will be excluded.
If you don’t need some keywords and phrases in all their possible variants, then you should go to the neighboring tab “negative keywords” at the top and add all those variants in the broad match by clicking on the plus sign.
Farewell note
Well, my dear readers, it seems to me that, now, it’s all that I wanted to tell you about in order for you to successfully create and run your first search campaign.
I know, the article was pretty long and you probably won’t be able to read it all at once and implement everything straight away but it’s absolutely ok. As you see the Google Ads system is a very extensive product that requires experience to work with.
I really think that if you follow all the steps that I’ve mentioned in my tutorial, you won’t be disappointed with your campaign and will soon notice the first customers already contacting you.
Nevertheless, although I’ve tried to do my best to make the info that I’ve provided here as detailed as possible, as I’ve mentioned in the article itself, there will be other, more advanced articles on this website.
Moreover, I also admit that I may have forgotten something or you may have some additional questions regarding something that I’ve covered here or not.
In this case, feel free to write a comment or contact me directly using the form at the right. Thank you for your attention. See you later!